tagged  VB, VB6, download, install, microsoft, msdn, msdn help, msdn library, visual basic, windows in Microsoft, PC, Programming, Windows
Microsoft, PC, Programming, Windows  This is an ongoing blog of web tools and technology related to worship, music and church. The idea is to give you good web points and resources that you can go to. Some of it is just me cruising the net, others are favorites of friends.
Enjoy what you see here. If you find an interesting, useful and technology related site or resource that deals with helping worship or musicians in general, please send us a note and we will check it out. Perhaps we can feature it here.
Thanks!
Enjoy! - Kim Gentes
If you have had to regress to installing Visual Basic 6 studio on your modern Windows OS (Windows 7, 8 or such) to support or maintain some older software, you will quickly remember the ease of the integrated MSDN library that came as part of the embedded help you could install with VB6. Today, if you do not have the original discs that the MSDN library came on, it can be next to impossible to figure out where to get the right version MSDN help that works with VB6, and once you have it, how to install it best for your VB6 use.
This is just a quick guide to help you locate where to download it, get it installed and up and running with your VB6 studio. The guide has 4 main sections:
If you already have the downloaded MSDN library from Oct 2001, skip ahead to the appropriate section and follow the extraction/installation instructions as appropriate. If you don't have anything, read this guide through completely and you will be able to download, extract and install the MSDN library for VB 6.
To legally download the MSDN Library for VB 6, you must be a paid Visual Studio Subscriber. You cannot get access to the oldest archived MSDN Libraries (this one is from 2001) without a paid level Visual Studio subscription (formerly called MSDN subscription).
Let me pause for a moment-- YES, you can download the MSDN Library 2001 edition from other non-legit sources around the internet. But I do not, and will not, recommend that. Three reasons: 1) It's illegal. 2) Those sites often are simply hackers using the bait of "free downloads" to get a virus installed on your computer. and 3) I have looked at a number of those sites claiming to archive this specific download and all of them exclude some part of the MSDN Oct 2001 Library from their download chunks- that is, it is missing some part that makes it incomplete. You can hassle and try to figure out if you have all the parts, if they are legit, if they are filled with viruses and if they will work. Or, you can simply use a legit Visual Studio subscription.
I have tried using the free Visual Studio account that anyone can get (Visual Studio Dev Essentials), but it doesn't allow access to the MSDN October 2001 Library (or any of the older MSDN Library downloads from what I can see). I was able to access it via Professional, Test and Enterprise level subscriptions.
Once you have your Visual Studio subscription login, then you can go to the download location quickly:
STEP 1: When you click on this link, MS will force you to login to your Visual Studio account. You must use your Visual Studio Subscriber Login to access this link: https://my.visualstudio.com/Downloads?q=2001&pgroup=MSDN%20Library
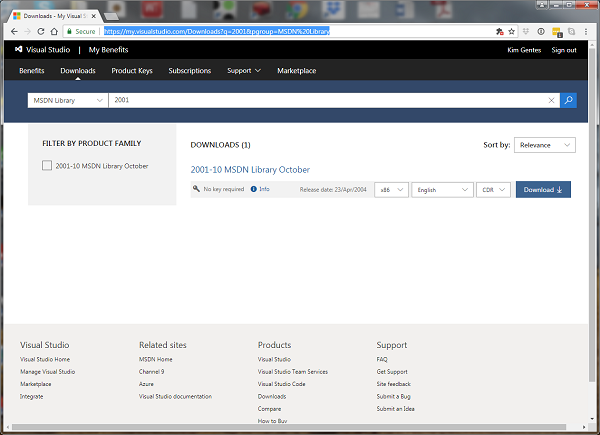
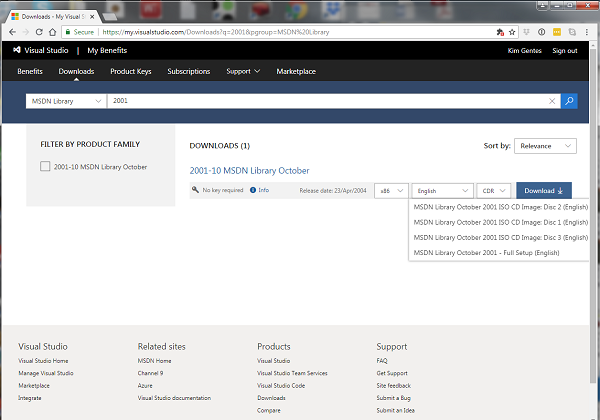
STEP 2: You should see the "2001-10 MSDN Library October" shown in the download results. You will note the bold, blue box that says "Download". Click that box to reveal your download options.
STEP 3:To get the full MSDN library to work with your VB6 Studio, download the "MSDN Library October 2001 - Full Setup (English)" (this file will be called "en_msdn_library_october2001_dvd.exe"). Alternatively, you can download 3 separate ISO files for CD-ROMs. NOTE: the total download is about 1.2Gb so it will take 20 minutes or so on a 1Mb/sec connection
STEP 1: Go the location where the download is located.
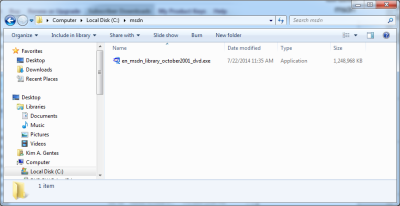
STEP 2: Double click the file "en_msdn_library_october2001_dvd.exe" and run it. It will open a WinZip extractor application.
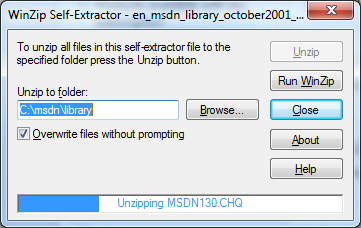
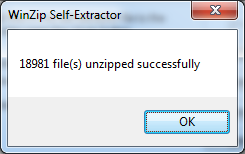
STEP 3: Click "Unzip" and the MSDN Library install files will be extracted to the directory you selected.
STEP 4: Once completed, click "OK" on the WinZip completed dialog (should show something like 18981 files extracted). Then close "Close" on the WinZip Self-extractor app.
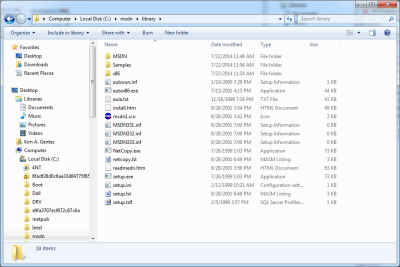
STEP 5: In the directory in which the files were extracted you should now see a complete Setup.exe and associated files and directories.
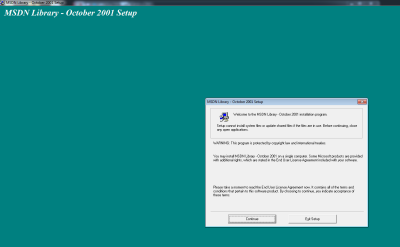
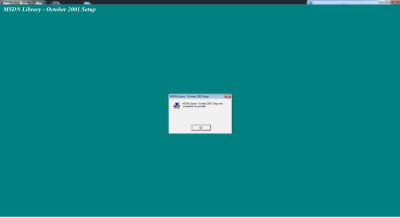
STEP 1: Double click the "setup.exe" file and it will begin the install of the MSDN Library
STEP 2: Welcome Screen - click continue.
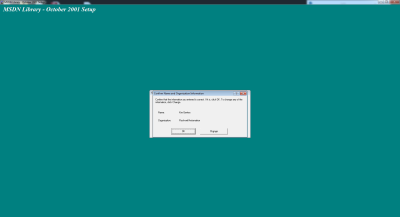
STEP 3: Name & Org - Enter what you'd like, click OK

STEP 4: Confirm Name & Org - Click OK
STEP 5: Product ID Screen - Click OK
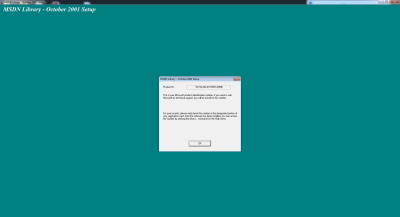
STEP 6: License Agreement - Click "I Agree"

STEP 7: Choose Install - In most cases, you can choose Typical, however, if you are just installing MSDN Library for VB6 usage, choose Custom
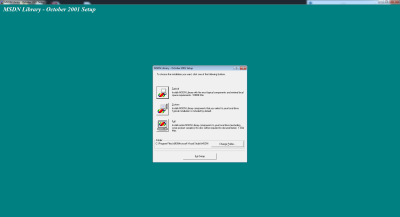
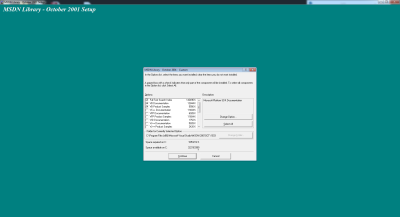
STEP 8: Options List - Choose the first 3 options in the custom install, and scroll down to select any other portions you wish to install of the library. Click "Continue"
STEP 9: Desktop Shortcut - click Yes or No, whatever you would like.
STEP 10: Let the MSDN Library install run. It may take several moments.
STEP 11: Install Complete - Click OK
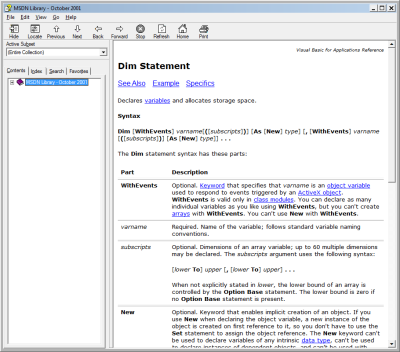
Now, when you run VB6, you can use F1 on any location in your code and VB context help will expand and link instantly as appropriate.
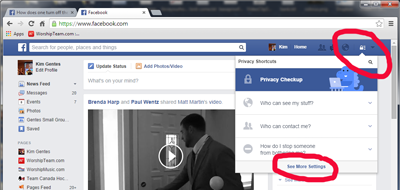
Microsoft, PC, Programming, Windows Facebook is tiring sometimes. And having the videos autoplay can be annoying when you are trying to find something in the feed. How do you turn off the autoplay? This one is relatively quick and painless.
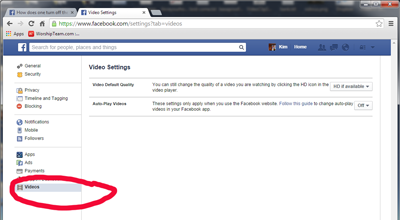
Click on the Privacy Shortcuts (lock icon) link on the top right of most browsers using Facebook. From the options that appear, select the "See More Settings" link at the bottom of the shortcuts listed. This should lead you here: https://www.facebook.com/settings/ . It should appear as below.
Click on the "Videos" link at the bottom left portion of the screen among the catagories of settings. This will make the "Video Settings" tab appear. It should be located https://www.facebook.com/settings?tab=videos . It should appear as below.
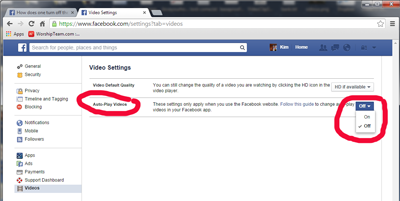
On the "Auto-Play Videos" setting select the "Off" option. You should be good now.
https://www.facebook.com/help/633446180035470
This tech blog post will be for the programmer geeks out there.
Recently, I have had to go back to reinstalling Visual Basic 6 on a Windows 7 workstation and trying to do some development/bug fixes. Specifically, I have been trying to get my dev environment working to debug some old VB6 OCX projects. After working through some initial lameness with installing VB6 (for example, it will always try to install an old version of Java on a new Windows machine- you can trick it out of doing that), I final got VB6/studio installed and could open my old VB6 project. A few more obvious issues after that, I was down to one error that I couldn't seem to solve.
When I opened any of the VB6 projects, I got the same series or errors trying to load the project. I have included the screen shots in detail here so you know exactly what I am seeing. I went through various Google and MSDN recommendations but nothing was working and I did not find a solution. Here were the errors I was getting:
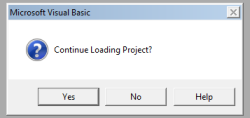
...continue loading project?

Errors during load. Refer to '<path>.log' for details.
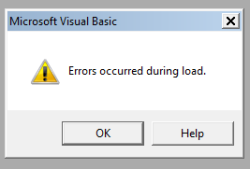
Errors occurred during load.
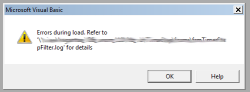
Errors during load. Refer to '<path>.log' for details.
The project finally appeared, but without some of the MS Controls that I had used in the project.
The error log file referred to in the screen shots contained this kind of error in my project (yours will vary):
Line 12: Class MSComctlLib.Slider of control sldInterval was not a loaded control class.
Line 37: Class MSComctlLib.Slider of control sldCallTimeout was not a loaded control class.
Line 54: Class MSComctlLib.Slider of control sldConnectTimeout was not a loaded control class.
Line 71: Class MSComctlLib.Slider of control sldTimeoutPeriod was not a loaded control class.
Line 88: Class MSComctlLib.Slider of control sldRetryPeriod was not a loaded control class.
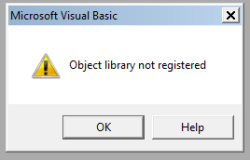
The real problem? The Microsoft Visual Basic 6.0 Common Controls ( MSCOMCTL.OCX ) was not properly registered. OK. No problem, I thought. So, I quickly went to my Windows/SysWow64 directory and I registered it by running:
> regsvr32 mscomctl.ocx
from the command line (as Administrator). Command shell responded that .ocx was registered successfully. Woohoo!
Only, once I re-loaded the VB6 project, I got the same error as before: "Object library not registered"
So, I thought I might have to force VB6 studio to re-associate with the OCX so I attempted to add the mscomctl.ocx file to the project via the Components menu in the IDE. No tamales. Response: "Object not registered". I even tried reinstalling VB6. No dice either. Bummer.
As I said, re-registering the OCX or reinstalling VB6 didn't help.
Back to Google and MSDN. I found a couple articles online that said to re-register the typelib as follows for Windows 7--
> cd C:\Windows\SysWOW64\
> regtlib msdatsrc.tlb
This apparently works on some computers, but on my machine as the "regtlib.exe" executable was not present in the SysWow64. In fact, that file as an exe does not exist on my machine. After a bit more searching, I found that the type library registration is now part of .NET framework. I had to use that equivalent binary inside of one of my installations of .NET to do the task. On my machine, the solution was as follows:
> cd C:\Windows\SysWOW64\
Once there, I ran the regtlib command from the .net version that is installed (latest) on my machine.
> C:\Windows\SysWOW64]C:\Windows\Microsoft.NET\Framework64\v4.0.30319\regtlibv12.exe msdatsrc.tlb
Registration of msdatsrc.tlb successful.
This command ran successfully and now I can open my VB project. Zippidee doooda! Now my VB 6 project loads successfully.
Since this took me a while, I assumed others may have run into this gauntlet, so I wanted to be sure to document the fix in case anyone else runs into this.
Keep on coding people...
Kim Gentes
Microsoft, PC, Programming, Software, Windows ![]() For twenty years I have been involved in worship ministry in local churches. It has been from both a sense of joy and calling that someone does that. In that time, I have had the opportunity to be involved in churches from 20-500 people, including two church plants and 3 established churches. Along the way, I've been invited to lead at various places with groups ranging from 10 to 1000 and more. Every context is unique and leading worship through music for each context means that you need the right tools and resources.
For twenty years I have been involved in worship ministry in local churches. It has been from both a sense of joy and calling that someone does that. In that time, I have had the opportunity to be involved in churches from 20-500 people, including two church plants and 3 established churches. Along the way, I've been invited to lead at various places with groups ranging from 10 to 1000 and more. Every context is unique and leading worship through music for each context means that you need the right tools and resources.
In many situations, having a compliment of skilled musicians for a full band is not possible. Church plants, special events, youth nights and other situations sometimes leave you standing there with your guitar, playing away, worshiping your heart out. I believe that God is honored when we give Him everything we have each time we worship- our surrendered hearts are what He looks for (Psalm 51:17). That being said, as your community is gathering you can sometimes find yourself with parts of a band (such as a drummer and keyboardist, but no bassist). These people are ready to serve, but it would be helpful to be able to "sub" in that missing player until a person arrives at your church who can serve in that role.
Enter "Worship Backing Band" (WBB for short). A couple years ago, I noticed that a number of these software tools were releasing to supplement musical tracks for musicians in local church settings. I had known the folks at Musicademy because of the great training resources they released over the years (which I had tried and reviewed favorably). So I knew I wanted to check out there new "Worship Backing Band" software at some point.
The version I was able to download is the latest (1.5) and it comes available for the Mac or PC. I choose to do my testing and using it on both a PC and a Macbook Pro so I could get the feel for both environments interactions. Downloading and installing it was simple enough. Once installed, I went and acquired a few songs to do my testing (I chose "Bless The Lord/10000 Reasons", "How Can I Keep from Singing", "Let God Arise" and "You Alone Can Rescue"). The model for this is that you purchase the player for $25 (it always comes with one free song of the month), and then you purchase individual songs that you need (priced from $8.99 down to $6.91, depending on how many songs you buy). Compared to the hundreds of dollars you might spend on Ableton Live (which I have and use, as well) on just the software, this is very, very affordable.
Once you download and install all the songs, you are ready to use the software. The nice thing about the software is that using it on PC or Mac is identical. The interface and functionality is replicated perfectly. Using the system is, above all, simple! The right pane of the application contains a playlist for the songs you want to use in your worship set. You load songs into it by clicking on the "library" button and exposing the songs available to you in the middle pane from your library. Drag and drop the songs from the middle library pane into your playlist on the right.
On the left side pane is a mix control panel for each of the instrument tracks in the song. Everything from lead voice, background vocals, acoustic guitar, electric guitars (2 tracks), keyboards (2 tracks), bass, drums and couple of click tracks (regular and shaker) are available. There is even a vocal cue track.
Here is how you use it:
Basically, 90% of what you will want to do with WBB is covered by those instructions. However, you can adjust the volume for any track if you want more/less of any instrument. As the song plays, you can also jump to or repeat sections using keyboard keys "<>" and "g". The beauty of this tool is that it is clear, simple, and easy to use. If you use a PC or Mac laptop, and want an easy-to-use software package for adding virtual instruments to your regular band members, you should really look at Worship Backing Band.
Once it was installed, I grabbed my guitar and was ready to go within just 30 seconds using this software and my Macbook Pro. While there are no advanced features for saving the segment flow of a song (only the mix), or for adding your own custom tracks, this program allows you to do what you minimally want to do. Musicademy has over 125 popular worship songs in their purchasable song library for your church, which would be 90% of the common songs used by many churches. That along with the the minimalist approach on the interface of this tool makes Worship Backing Band simple, clear and easy-to-use. The nice thing is, you don't have to spend any money to try WBB out. Musicademy has a functional demo version of the software that you can download for Mac or PC. Below is a summary video that is all the instruction I needed to get going and use WBB.
If you want to try out Worship Backing Band, go here and check out the details, download the demo and see the song library: Worship Backing Band
NEW WBB 2.0 Update: After I had completed the initial review of version 1.5, I was able to get a sneak peek at the latest update to WBB version 2.0. This new version comes with a number of significant updates for those who want more power and control. It is important to note that the new Worship Backing Band software (v2.0) will be called "MultiTrack Pro Wav Player". The current version will still be available for those wanting the current functionality and not needing anything else. The main updates I found bring the player up to another level of helpfulness for the local church worship leader. Here are the highlights:
All in all this "MultiTrack Pro Wav Player" update is great. Be sure to check out Worship Backing Band.
Review by Kim Gentes
 One of the most commonly asked questions and controversial topics in churches is "how loud is too loud" for music in church worship settings. It is often the responsibility of the music or worship leaders to manage a sound technology group that provides the tools and operation of the events in a church. But many of those leaders are professional sound engineers. So what are they to do?
My best advice- get advice from a pro! One of those guys who is a pro is Jeff Dykhouse. I first got to know about Jeff on the liner notes of dozens of worship CDs. As a music reviewer, I ended up seeing Jeff's name constantly inserted under the assignment of "engineer" or "mixed by" on many well known worship projects. When I had appeared on a Vineyard CD in the early 90's (ya, I've been around that long), once again, I was not surprised to find Jeff's name on that. Folks over the years have told me about Jeff's work on recording projects, and also his work in local churches- helping to consult to make their sound systems work great.
But recently another friend pointed out that Jeff also has posted some really good articles on the proverbial church worship question "how loud is too loud". Jeff answers this question in three excellent articles that are worth a serious look. If you are a church, you use a sound system and you have this question come up often, there is no better a place I can recommend than having you first read and take to heart Jeff's concise answers in his three-part post. You can find them all here:
How Loud is Too Loud (Articles 1-3): http://bit.ly/10kkO5K
by Jeff Dykhouse
I trust that will help many as we all look to make the sound an asset in our worship facilities instead of a liability!
Worshiping with you!
Kim Gentes
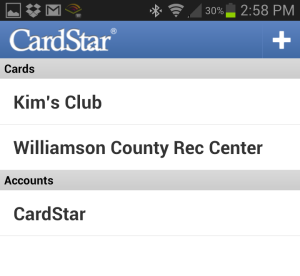
Audio, Consulting, Mix, Sound Tech, Sounds, Volume  The other day I was walking up to the local county rec center where I work out. I realized that I didn't have my membership card. Ugggg.. For the next few weeks I went through the tiresome task of having the attendant look up my membership information manually each time I checked in to the rec center (I would have had them give me another card, but they charge $5 for a replacement card!). One day a kindly attendant says "Do you have a smart phone?" Of course I do! She tells me to download the Card Star app. I do. She tells me my membership number. I add it as a card number and BINGO-- a scannable bar code with my membership card ID in my smart phone.
Now I can check in at scannable card businesses all day long- no card required. Turns out that CardStar has already dozens of built in card formats from various businesses and affinity clubs. If your particular card isn't in there, just use the "Other" designation and enter the ID. The scannable bar code is automatically generated. You store it, and its there for retrieve whenever you need it.
I know this sounds pretty simple and unsexy in terms of technology, but it is amazingly helpful and allows me to throw away almost all of my membership cards! Thank God!
There is app for Android and iOS devices. Download it. It is real helpful. Oh ya, its free.
Again, here is how you add a simple card to it.
STEP 1 - Start the app, Click the "+" button on the far top right.
STEP 2 - Scroll through the list of companies on the screen. If you find your company, select that one. If you don't, scroll to the bottom of the list of companies and click (other).
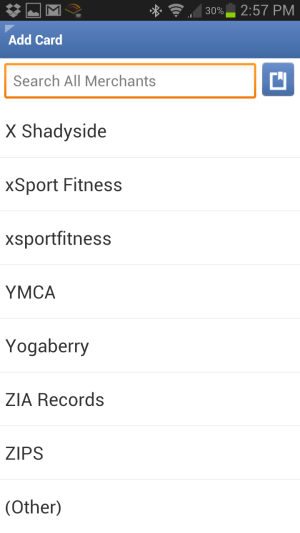
STEP 3 - Enter your membership ID/number (click the Check Mark in the top right when you have entered it)

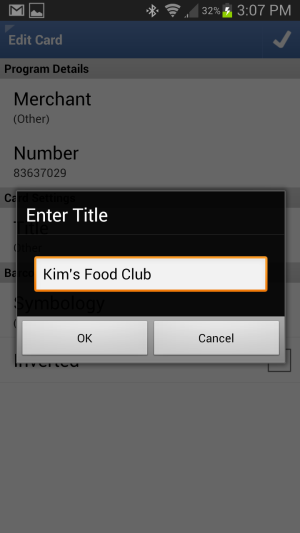
STEP 4 - The next screen will be the "Edit Card" screen. Select the "Title" field to assign the name of the business/club. Enter the name of the business. Be sure the select the OK button to complete the name. Then select the Check mark on the top right again to save your changes.
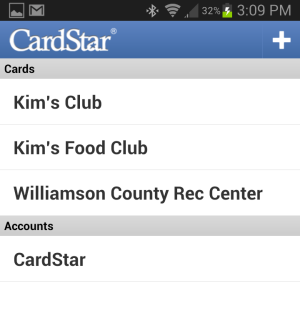
STEP 5 - Click the top left edge of the app screen to go back to the main menu.
Now, whenever you need to access your membership card, just:
STEP 1 - Select the name of the club/company.
STEP 2 - You bar code will appear and be ready for scanning.
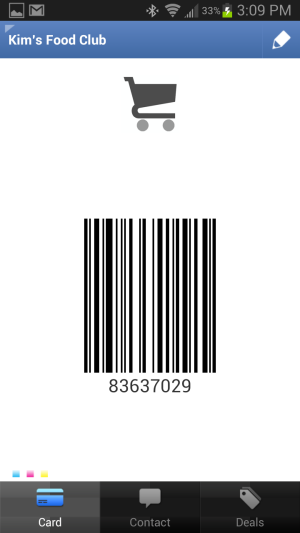
Pretty cool, ya. I think so. Good scanning folks.
Kim Gentes
Editors Note: I have received a number of requests from people asking about video streaming of their worship services, and I am so happy that I got permission from these fine folks to include some helpful resources on the details of doing this for your church. Below is a 3-part resource (video, audio and PDF) that should help any church get an idea of how to get started in this area. Thanks Dan & Kevin! - Kim Gentes
How To Stream Your Worship Services Online
With Dan Wilt (WorshipTraining) and Special Guest Kevin Weimer (WorshipStream)
 Description: Every church can benefit from streaming their services online. In this webinar we will talk about why churches stream, should it be live or on-demand, one camera versus multiple cameras, and what do you need to get started. There are literally countless options on how to implement a system for streaming, but we will focus on the basics of what you need to know to begin. This is a very practical (non-super-technical) look at how easy it can be to start streaming your services and events online.
THREE (3) RESOURCES: The video, audio and PDF resources that were presented in this webinar are available below in full form below.
Resource 1: Webinar Video
Resource 2 and 3: Audio & PDF Downloads
Free Resource Downloads for "How To Stream Your Worship Services Online"
by Dan Wilt & Kevin Weimer
|
|
|
Editors Post-Logue: If you have further questions about streaming your worship or church services online, you can contact Kevin Weimer directly via http://www.worshipstream.com . He is very knowledgeable in this area and will help answer your questions. I have personally used WorshipStream.com services before and highly recommend them. Sincerely, Kim Gentes
Sometimes you just want to put a poll together that has simple functionality, easy use and no cost. Google has tons of features and it makes sense that inside of one of them we should be able to put together a code snippet for embedding a poll in a website or blog. Google Docs is the ticket for doing this. Here is a quick and easy guide for creating a poll for Google Docs users.
STEP 1 - Create the Form
Go to Google Docs, use the Create drop down, select "Form" as you see below

STEP 2 - Set up Form
Next you will see a new form presented to you. Depending on whether you are using Google apps or just an individual use account you may have different options at the very top, but in any case ignore those check-boxes at the very top for now.
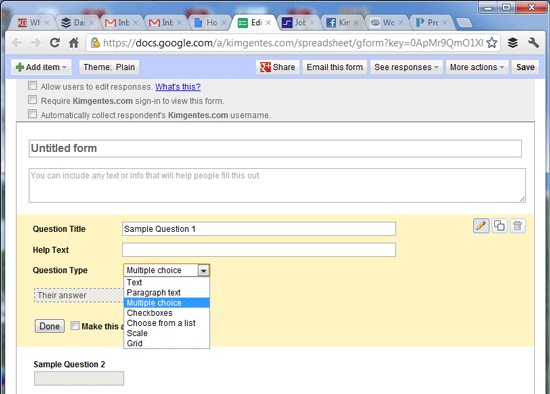
In this example, we will just create a bulleted form for a multiple choice question (you can do others as you like). For our example change the Question Type to Multiple choice, as you see below.
STEP 3 - Customize the Form and Questions & Answers
Now let's get down to your actual questions and answers in your form.
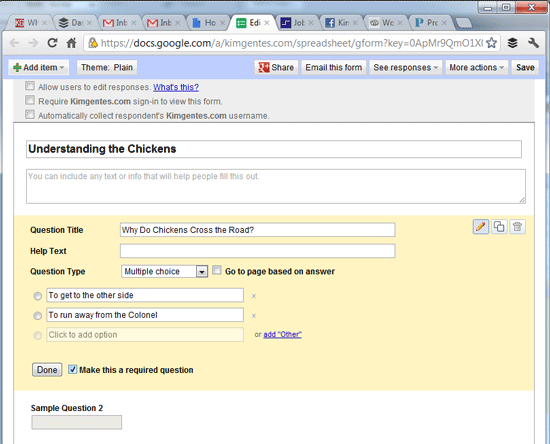
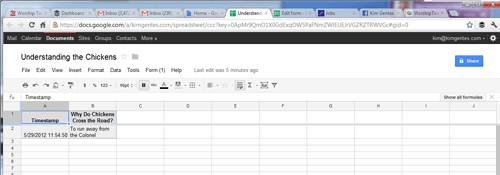
In this example, you can see I have called the form "Understanding the Chickens". Every form can have multiple questions, but I am just going to have one question for this example. My question title is "why do chickens cross the road". I also start entering some possible options for answers. Note that I also select the check box at the bottom of the question "Make this a required question", so that people must answer it. See below.
STEP 4 - Clean Up a bit
When you create a form, the default template automatically puts up a second sample Question. It's at the bottom of the form. For our example, let's just delete it. The delete button for any form element will be on the far right of the page area, as you see below (at the bottom of the image).

STEP 5 - Save and Preview Form
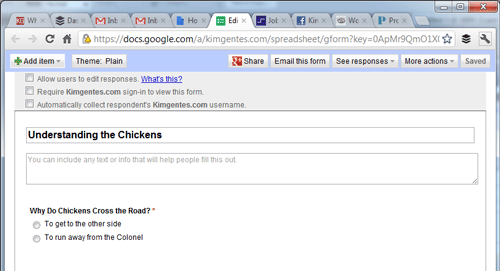
When you get things looking like you want, click the "Done" button the question you are editting. Then click the "Save" button on the top right hand area of the page. When you do that, the form will appear in the mode that users will see it, allowing you to preview it. Our sample should now look like this below.
STEP 6 - Edit the Confirmation Page
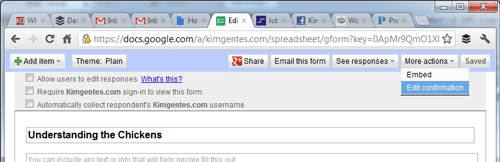
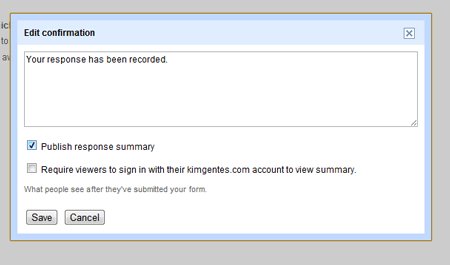
Google forms lets you edit the page that users see when they complete the form. You do this by first selecting the "More actions" drop down on the top right area of the page, and select the "Edit Confirmation" selection as shown below.
Immediately, you will be given access to the "Edit confirmation" dialog. This allows you to change the text as you wish to the user response page. But more importantly, it allows you to include a link to the summary data for your users. All users like to find out the results of most polls and this is what allows that. Make sure you select "Publish response summary" checkbox to allow your users to see the results. Again, unless you are using Google Apps for your domain, skip over the other checkbox for that. Your form should look like the following.
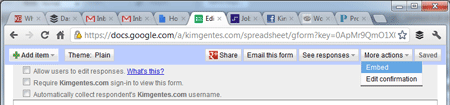
STEP 7 - Get Embed Code for Your Poll
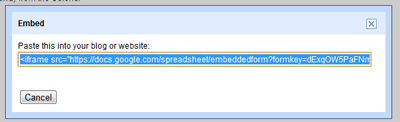
You are on the home stretch, and just a couple things left and your poll will be live on your site. Before you can post the poll on your site, you must get the code from Google Docs. This is easy enough. On the form, once again select the "More actions" drop down on the top right area of the page, this time select the "Embed" selection as shown below.
Immediately, you will be given access to the "Embed" dialog. This has one purpose- to let you copy the embed code from Google for use on your site. Your form should look like the following. Just copy the code to your computer's paste buffer for now.
STEP 8 - Paste Embed Code on your Website/Blog
Now take the code you have in your paste buffer and drop it into your own blog, CMS, webpage or such. Whether you are using Wordpress or native HTML editing or such, there will be a way to paste code snippets into your page. Check the instructions for your particular site editor on how to add widget code, and this will be the way you add this code snippet for your poll. In the case of our example, I am using Squarespace for my website, so I add my poll using its "Insert Code Block" icon, which is just a way to add custom widgets or code from other sources than the editor gives you. You can see me pasting the code as shown below.

You are now done adding your poll! Congrats! However, you will want to know how to access the poll results and go back and edit things later if necessary. See below for that info.
STEP 9 - Reviewing Results and Making Changes Later
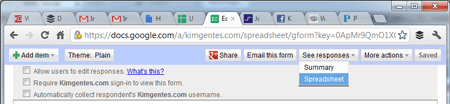
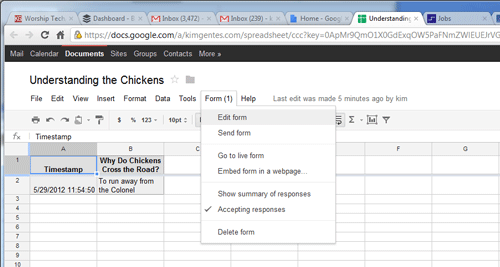
Reviewing the poll results at any time is easy to do. The results are stored in a spreadsheet, which you can access from the form. You do so by selecting the "See responses" drop down from the top right area of the form, and selecting the "Spreadsheet" option, as you see below. The spreadsheet will also be viewable directly in your google docs directory by now, if you are looking directly at that directory.
Once you access the spreadsheet, you will see the results in a regular cell/row layout, showing the responses of each poll-taker as you can see below.
STEP 10 - Making Changes to the Poll After It's Launched
The great thing about Google docs is that you can always update or edit your forms/polls. When you access the form from Google docs it will open up to the spreadsheet view by default, but don't worry, you can always get back to the form editing/layout very easily. Simply, notice on the top of the spreadsheet view that there is a tab called "Form". Use that and select "Edit Form", which is the first drop down in the list, as you can see below. That will bring you back to editing the form. Also, of note are the several other features of the forms, which include a cool way to send the form via email or even shut down the poll so you can stop taking results. All very cool.
SAMPLE POLL
Below is the sample poll we've created in this step by step tutorial. Enjoy!
App, Blog, Programming, Social Media, Web, Web Applications, Web Service If you have Windows 7 you may be using the feed feature to update a constant stream of background images to keep your desktop fresh. If you are like me, occasionally a family member sees your background image and wants to use it, but they don't want to be on a feed for changing it regular. Or maybe you just love the background image and want to save it and make it your permanent image. Windows 7 allows you to access images in such a feed, and then you can save them offline for permanent setting. Here is how.
First, move your cursor to your desktop and click the right-mouse button. This will reveal a context mini-menu.
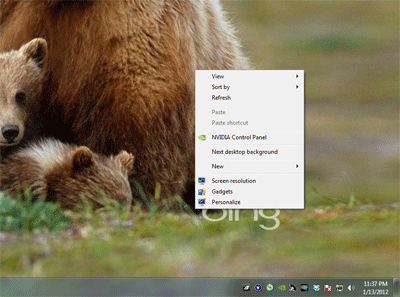
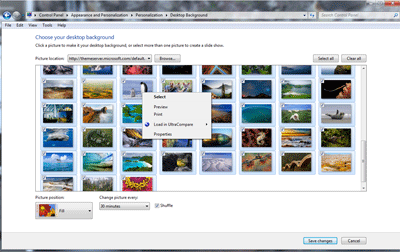
From that menu, select "Personalize" (normally, the last option). This will open up the Control Panel applet for personalization. One of the themes in use will be selected. If you want to access pictures from any other place than the current one in use, select that theme now.

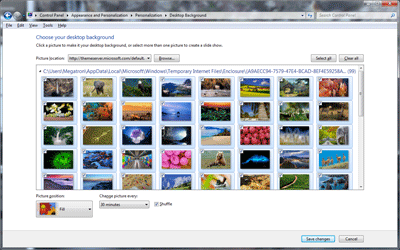
At the bottom of the applet frame you will see an icon labele "Desktop Background" with the words "Slide Show" undernearth. Select that link.
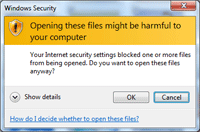
This will open up the library of images in the theme/feed you are interested in. Scroll down to the image you are interested in and right-mouse click the image. If your theme is a feed from the internet, this will bring up a security warning.
Select "OK" if you get the security warning (assuming your image feed/theme is secure and ok).
This will bring up another mini-menu. Select the "Preview" option on the mini-menu.
This will open the image in the Windows Preview browser.

Use the "File" menu on the Windows Preview application. Use the "Make Copy" option and save a copy of the image file to your desired location.
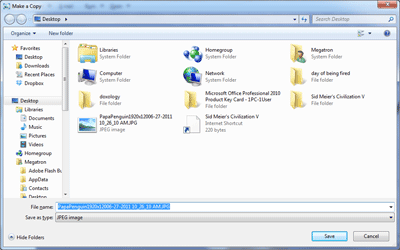
You now have a copy of the desktop image from your theme or feed.
Kim Gentes
![]() If you are in the world of web or app development, the proliferation of devices and platforms in the last few years has been the bane of your existance. Just when we thought there was 2 browsers taking the hill, 3 more stand up. Now, the field is mashed into 4 very competitive browsers - IE, Firefox, Chrome, Safari (and smaller but still strong in mobile, Opera). Alongside the browser flattening (from just IE/FF), OS platforms have exploded, again especially on the mobile side. The main proliferations are iOS, Android and Symbian, with some revs of Windows and Blackberry chewing up the remainder of users.
If you are in the world of web or app development, the proliferation of devices and platforms in the last few years has been the bane of your existance. Just when we thought there was 2 browsers taking the hill, 3 more stand up. Now, the field is mashed into 4 very competitive browsers - IE, Firefox, Chrome, Safari (and smaller but still strong in mobile, Opera). Alongside the browser flattening (from just IE/FF), OS platforms have exploded, again especially on the mobile side. The main proliferations are iOS, Android and Symbian, with some revs of Windows and Blackberry chewing up the remainder of users.
So here is the deal. All those browsers and platforms have changed so significantly, that the underlying technologies have become a mashup of mobile centric functionality (such as touch-screen operation, screen resolution/orientation), HTML5 A/V capabilities and desktop CSS sensibilities (along with web font assets etc). A modern mobile phone has a unique dialect for browsing websites and using its hardware and accessing the datastreams it connects to- notably digital cell phone calls and internet surfing. Dumbing down the desktop versions of HTML and browsers into a mobile version is no longer an option. iOS and Android (both webkit-based) browsers have forced us to see the world of mobile as unique. In fact, it has pushed back much of the simplicity and elegance demanded of mobile devices back onto the design of desktop via what I call the "iPhonification of websites". We are seeing web 2.0 (and 3.0) largely with the flavor pushed back onto the desktop world from the success of Apple's mobile i-world.
OK, so that is the set up. Once we see the mobile world has its separate needs and reasons for requiring a different technology subset, we recognize that perhaps we need a different way of architecting these mobile browser experiences. For the last 3 years, much of the desktop AJAX experience has been fueled by support from a toolsuit called jQuery. Free, but brilliant and solid software modules that provide a framework for AJAX/Javascript development and function. And, up until now, people developing for mobile have been cramming jQuery solutions into mobile devices to stay consistent with their server side support.
Life just got a bit clearer. About 10 days ago, the version 1.0 of jQuery Mobile finally released. Initially, this will actually make more work for those software developers who want to support all the platforms that are continuing to proliferate onto the marketplace. But with the creation of this unique mobile version of jQuery, hope rises for the huge range of sites/apps that rely on jQuery as their mobile solution for an AJAX foundation.
The new jQuery Mobile stands on top of (not in place of) the jQuery core, and reaches into various areas, most notably the touch functionality. Everything from attribute references to PhoneGap update tips are included on jQuery Mobile's flourishing documentation. Everyone in the app/site space is rushing to support mobile, but none of that is possible (in a good long term way) without platform tools like this being brought to bear in the mobile space.
All you geeks out there can check out jQuery Mobile for yourselves right here.
A big shout out to all the folks in the jQuery cloud that make it all happen.
Kim Gentes
Editor's Note: This tech blog entry is made by Jordan Gentes, a cell phone expert who is also a web support technician for WorshipTeam.com. Jordan has spent years studying phones, from various companies, carriers and plans and the depth of cell networks and technologies. When he says something about cell phones, I listen, because he is speaking from more experience and knowledge than anyone I know on the topic. ---Kim Gentes, Editor
 Windows Phone 7.5 Review
by Jordan Gentes
Microsoft’s new phone platform Windows Phone7.5 is intuitive, simple, and brilliant. Wait, did you just use those three words in the same sentence as Microsoft and Windows? Yes, I did. This new development by Microsoft brings an important piece to the mobile environment.
Intuitive: The OS its-self is very intuitive. When you power on the display you are welcomed to live tiles that are beautiful and easy to understand. Gone are the days of cluttered notification bars and crowded clusters of apps. Windows Phone ushers in a day of relevant information that updates seamlessly.
Simple: With the introduction of live tiles the Windows Phone OS is super simple to navigate. The OS is attractive to all ages, something that neither iOS nor Android can say. This OS provides an enjoyable user interface that is simple, but powerful.
Brilliant: Windows Phone is brilliant; so many functions that users count on daily are built into the framework of the user experience.
Synopsis:
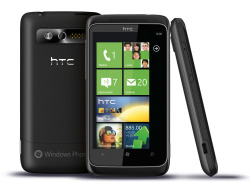
![]() This particular review was conducted on an HTC Trophy, however, yet another thing I love about Windows Phone is every phone gets updates, meaning everyone has a congruent user experience. The battery life on this particular device is incredible (for a smartphone) I easily go the entire day with no problems. On one day of very heavy usage I got a low battery warning at 15 hours, however, on a normal usage day (that would involve several emails, 100-150 text messages, 30 minutes on the phone, and some casual internet browsing) the phone still had 40-50% battery remaining at 15 hours. Battery usage will vary by device somewhat, however, the OS manages power quite efficiently. Windows Phone is a true representation of a modern mobile experience. Windows Phone is clean and it’s such an inviting user interface that I am confident anyone would enjoy the experience.
This particular review was conducted on an HTC Trophy, however, yet another thing I love about Windows Phone is every phone gets updates, meaning everyone has a congruent user experience. The battery life on this particular device is incredible (for a smartphone) I easily go the entire day with no problems. On one day of very heavy usage I got a low battery warning at 15 hours, however, on a normal usage day (that would involve several emails, 100-150 text messages, 30 minutes on the phone, and some casual internet browsing) the phone still had 40-50% battery remaining at 15 hours. Battery usage will vary by device somewhat, however, the OS manages power quite efficiently. Windows Phone is a true representation of a modern mobile experience. Windows Phone is clean and it’s such an inviting user interface that I am confident anyone would enjoy the experience.
Amazon Product Link: HTC Trophy Windows Phone
In a recent blog post, I wrote about my approval of the new Kindle Fire. I like it a lot! But immediately, I had people asking about the comparitive features of the iPad and how would I rate them. To be clear, the two devices are both tablets, and both aimed at consumers. But both have different focuses, and are clearly best applied to their given strengths. To explore this closer, I put together a short feature table below. Each of these items are just my feedback on each of the devices and their strengths. I own one of each, and am happy with both devices, but would use them differently, according to their strengths.
If you are looking at purchasing a device, consider what you are interested in using the device for and see which device leans towards the features you are most excited about.
| eBook Reader |
10
|
7
|
|
|---|---|---|---|
| Web Surfing |
8
|
7
|
|
| Movie/Video |
6
|
8
|
|
| Music Player |
7
|
6
|
|
|
6
|
7
|
||
| File Sharing |
7
|
4
|
|
| Apps |
6
|
8
|
|
| Gaming |
6
|
7
|
|
| Size/Form Factor |
9
|
7
|
|
| User Interface |
8
|
7
|
|
| Performance |
7
|
8
|
|
| Typing/Editing |
6
|
8
|
|
| Battery |
6
|
6
|
|
| Price |
$199
|
$499
|
|
If you are interested in have a excellent ebook reading experience, web surfing, music playing (stereo speakers), sleek user interface and like small device size, then the Kindle Fire is in your strength list. If you are interested in watching movies, having a lot of custom apps usage, gaming usage, or want to take notes or data entry then the iPad is a strong device to consider.
What is also important to remember is this- the iPad and the Kindle Fire use the same essential hardware processor and architecture, but the iPad runs iOS and the Fire runs Android. The differences in iOS and Android propogate much of the technical comparisons of the two tablet- iOS runs more tightly and slightly better performance; Android runs with broader access to external connections (even USB ports) and file systems giving you easier access in such areas. Such technical considerations are not often important to general users, since apps are virtually becoming synonymous across both the iOS and Android platforms. But they are important to technical people and developers.
If you are user, use the device that meets your needs. Technical considerations are less the issue.
As with everything, utility is the king. At the price point of these two devices, it's important not to ignore your real functional requirements, since much can be saved (cost-wise) if you lean more to the Kindle Fire and it meets your needs. But if you must have the strengths of the iPad on your side, be sure you are ready to pay 2.5 times more for the Apple brand.
Kim Gentes
 There is no denying it, Apple has been the uncontested monster at consumer devices in the last decade, with iPods, iPhones and iPads. With few flops, save the Apple TV (twice), Steve Jobs and co have led the revolution of simplicity and elegance on designed electronic goods. And frankly, they have opened up new markets that told the customers what they should have, instead of trying to make tweeks to the current world of electronics as they were. So that was the last 10 years. But now, with Jobs gone, what does the next 10 years look like.
Perhaps, not "more of the same", if Amazon has anything to say about it. In fact, with the launch of their latest device Amazon looks like they have finally decided to weigh in, and weigh in heavily, on the device market. Not satisfied with having the world's most popular ebook reader, Amazon has launched a new line of Kindle devices that compete head-on with real tablets. Here is my review of the first version of that device.
 Today is November 15. It is a significant day for many other reasons, but one small reason is the arrival of the new Kindle Fire, personal tablet from Amazon. I had preordered the tablet for work reasons, but was anxious to get it open running as soon as the UPS man rang the doorbell.
The unveiling of my new Kindle Fire repeats a theme that has been taught well by Apple- simplicity. But Amazon takes this theme and perfects it, and expounds on its uses in a broader context. The shipping box containing the Fire was simple and well packed (all with eco-conscious packaging), as is most everything Amazon does in fulfillment.  Popping the box open revealed the device (and a small power chord) and a simple sleeve box top. Inside the sleeve was a simple paper card, containing literally 5 simple sentences of instructions. No monster guide, no thing "getting started" manual, just a single card with a big picture and less than a handful of words (which all fit, nicely, in my hand). User guide? Who needs a user guide- this is the new Kindle. OK. Prove it.
The device itself is all black (mine anyways) with just one physical button (power), a single USB connector/power port and a mini-jack for audio. All located at the base of the portrait-held device. There are shallow indentations at the top edge for the audio speakers. The back of the device is a grippy, rubberized cover. Nice tactile surface,  that doesn't slip from your hand and isn't rounded, unlike the iPad 1 whose rounded aluminum back was always slipping and pushing away from the user. Physically, the Amazon Fire form factor is literally 1/2 the size of iPad 1. However, the screen size of the Fire is only about 75% of height and 2/3 of the width, so you are still losing significant screen size, but it feels still large enough for use in your hands.
Booting it up, the Kindle Fire was ready to go by immediately powering up when I plugged it in. And the question to get going on the device quickly had me choosing a network and time zone.
Next came the fun surprise of seeing that the device recognized its owner without me doing anything. Presumably the device was tethered to my purchase account somehow, and immediately recognized who was the owner. Regardless of how this happened, the device customized itself to me and quickly loaded its updates and my own content connections.
On first opening of the device, initial "welcome" guides show how to use the basic functions of the device. In two or three easy arrows I was ready to run and rock with my Fire.
 Quickly, I jumped around to see all my kindle books (from my previous purchases of kindle books on the iPad app), all my audiobooks and Amazon cloud music was all available on this device. Some initial download time would get content, but all was accessible without extra logging in or such. Love it.
I quickly went to the web browser and walked through a number of sites, including our favorite, WorshipTeam.com. The Kindle Fire performed excellent on all fronts. Websites with HTML5 and Flash worked perfectly and the performance was snappy. Battery seems to be charged close to top when you get the device, but I topped it off. After five hours of playing media and websites and even videos, the device was still at 84%. Not sure what its battery specs are, but it seems pretty decent on heavy media usage. My version has 6.5Gb of storage, and I began downloading things to it.
After testing out some WorshipTeam.com functions, including the 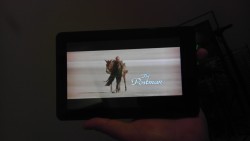 Android app for it, I went into the Amazon Prime area. I happen to also be an Amazon Prime user, so I was able to quickly access its library of many thousands of videos. I watched a couple minutes of Kevin Costner's "Postman" and the app, media and device performed seemlessly. The video was smooth, audio clear and I wasn't even using headphones, just listening through the on-device speakers.
From there, I went to the Android marketplace and installed a few apps and even downloaded a few not in Amazon store, to see how non Amazon-store apps would work. Answer- perfect! Android apps work well on this device, which of course is an Android tablet. I ran WorshipTeam.com app and it was crisp and responsive.
 Overall, I like the Fire a lot. Primarily, the UI is its biggest advantage. Smaller than the iPad, it makes a book reading experience work, where the iPad is cumbersome. Movie view is good, though smaller than the iPad. For large app experiences, like car racing, the iPad is nicer, but for practical usages, the Kindle Fire seems well suited and nicely sized. While this device won't eclipse the iPad for now, it is a huge step forward to a functional, easy-to-use, and perfectly sized tablet. The preloading and easy connection of Amazon content is a long term combo-punch that iTunes can't match yet. iTunes is fine, but ultimately Amazon truly seems to understand content better than Apple, from books, ebooks, movies and music. As they catch up with their device, I think you will see that content becomes the ultimately powerful propellant to growing this new tablet ecosystem.
Win Amazon. I highly recommend it!
Amazon Link: Kindle Fire, Full Color 7" Multi-touch Display, Wi-Fi
Review by Kim Gentes.
Amazon, Android, App, Blog, Device, Flash, Hardware, Kindle, Kindle Fire, Media, Mobile, Planning Tools, Review, Social Media, Web Applications, Web Service - Music, Web Service - Video, iPad This last week, I took a couple of my Apple products to my the Genius Bar at the local Apple store. For the uninitiated, the Genius Bar is Apple's brand of "customer service table" that one brings all problems to in Apple-land. I have to say, I came away pleasently surprised at my overall experience. I was ecstatic with what they did with one device and left scratching my head with how they handled the second issue.
Since I brought in two devices, I will outline what happened for each:
 Part 1 - Macbook Pro
I took my Macbook Pro laptop in. The actuall LCD screen had cracked. I hadn't dropped it or lifted it by the screen or anything. I opened the screen one day and it was cracking across the middle from the left. After about 2 days it was completely cracked across the entire screen.
The tech looked at the screen and immediately said the following things:
I was beginning to let me blood boil a bit when he said, "those are all the things I am supposed to tell you. And I have. Now the good news. I am going to replace the screen without any further questions or cost to you."
Wow. I felt a nice happy moment. An Apple happy moment. I let it sink in. :) Of course, I know that comes directly out of shareholder happiness, but as a product owner it was nice to feel some goodness.
In the very same visit, the next thing also happened.
 Part 2 - iPad
I bought my new iPad in April of last year (2010). It arrived on April 13 via UPS. Three or four days ago, I plugged in my iPad to my Macbook Pro. iTunes on my Macbook Pro recognized the iPad and notified me that I should update to the latest software for iPad. I clicked accept and it proceeded to update to the latest iPad software revision (according to my iPad I have Model MB292LL, and it now has Version 4.3.5 (8L1)). The iPad rebooted after its update and all looked well. I was wrong.
Since then, the iPad hasn't been able to connect and be recognized by my computer. I also won't take a charge via USB /wall plug. For a couple days, I assumed I just needed to reboot or reset some part of the device. Finally, at 45% life of the battery I was concerned and I brought it to the store. They tried all they could think of. Nothing worked. Since it won't talk to iTunes (because it won't communicate through USB connection anymore), they said they can't reset it.
"What to do?" I asked. "Nothing" they said. It wasn't covered and they "believed" it was a hardware error, not software. Since they couldn't connect to the iPad from a Mac, they couldn't tell for sure. But even though it was the last update that marked the onset of the problem, they refused to believe that. My iPad was simply my problem. Nothing to be done. "Get files off by using WIFI if possible", they said, "before battery went total dead". The message was clear- sorry, its your problem, too bad. Next customer!
What the?! I really felt like this was bad judgment since the device clearly had worked fine for me for a year and now a software update causes a problem and they wash their hands of responsibility. While I was glowing with happiness at their Macbook Pro response, this made absolutely no sense to me. I left feeling a little like they didn't think it was worth it to help me on the iPad but since the Macbook Pro was more expensive, they'd make sure I didn't hate them.
Kim Gentes
Anyone else out there have a Apple Genius Bar story? Let's hear it.....
Friends,
When I do a review of anything, I do so under my own convictions and opinions. People don't pay me to  do reviews. Occasionally, I do get demo products sent to me, but more often than not, I review items I purchase and just tell you about it. Either way, the goal is to give you honest, hopefully knowledgeable, and always fair reviews.
Back in February of this year, I posted a review of an iFrogz cover (original review is here). iFrogz "Luxe Lean iPad Skin" is a hardshell polycarbonate iPad protective cover. I loved the tactile/functional feel of the cover and liked the look of it as well. It also seemed well made. Well, we wanted to update you on the item so that you know how it did during normal lifetime of use.
First, of all, as you can guess if I am writing an update now talking about product lifetime that means the cover's life has come to an end. If the cover only lasted until August, something was seriously wrong. About June, the corner of the cover developed a crack. The way I used my iPad, I only rarely took it out of the cover. I just felt it was safer, since there was always a chance I could accidentally drop it or something. I was surprised a crack developed in the cover, and I can't honestly remember if there was any bump or something that happened to the iPad. There certainly wasn't anything major or I would have noted that as a possible cause.
In any case, the cover developed a small crack. Once that happened, the cover corner with the crack deteriorated quickly. The whole are looked dry and brittle. Within 3 weeks the entire corner fell off when I was trying to put the cover on/off. Once the corner fell off the cracked cover case was now brittle, sharp and dangerous, becoming a hazard itself. I took the cover off completely to avoid slashing myself with the jagged, sharp edge.
I was, obviously, disappointed in the cover, especially after giving it a positive review on my initial purchase. Of course, there was no way to know it was going to deteriorate, but I wanted to make sure to send an update so that you would know what happened, especially if you were considering buying one based on my original review.
by Kim Gentes
Accessories, Blog, Hardware, Mobile, Review, iPad  Sometimes all you want to do is make some pattern for rhythm that you can use as a loop pattern for other things. Or maybe you are working on a quick idea and aren't at home to put it down in your music creation software or access to your instrument. Or, perhaps you are just curious as to how you can see a rhythm track in a linear format. Beatlab is an online simple tool for building basic loop tracks, much in the same core way that anyone would compose a loop for electronic music, or even lay down a rhythm section with MIDI or loop software. But it is online, simple and free to use. There are user plugins for uploading your own sounds and a lot of features once you have the basic things down. You can even download your loop for use offline, which is kind of nice.
Beatlab isn't necessarily for hard core development of songs, but I like it as an inspirational pit stop on the creative internet highway. I stop by occasionally if I have a rhythm in my head and I want to flesh it out without pulling out all my musical gear. You can save your compositions too, so you don't lose online ones you've created. It uses your Facebook credentials to store context, but it is not heavy handed (like some Facebook apps are) as it always asks if you want to post things to Facebook before doing so. I like that courtesy. One note on the technology side of this site- like almost every music app online- it does use Flash. So it won't work on your iOS devices. Just pure web folks.
Anyways for the loopers, scratchers and tweekers of the electronic and rhythm worlds, BeatLab is like stopping at Wafflehouse- not exactly the kind of meal you'd do important dates at, but it has the basics when you need to use them. And heck- its free. Check it out.
Here is a very simple loop I created with it.
I noticed a lot of other users creating more beat loops for rap and such. I prefered a bit of an electronica loop myself, but you can create whatever you want. Go try it out.
in the rhythm of heaven
Kim Gentes
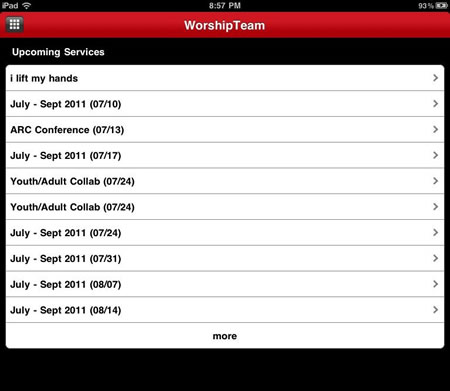
App, Facebook, Flash, Media, Music Training, Web, Web Applications, Web Service - Music  WorshipTeam.com announced an update to its iOS app today with a some nice extensions to its service.
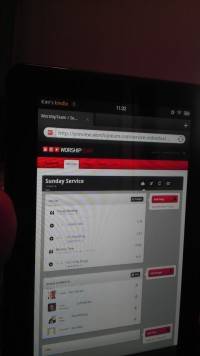
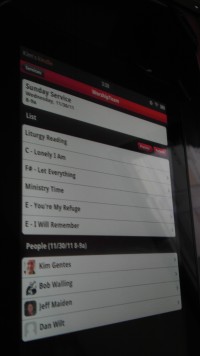
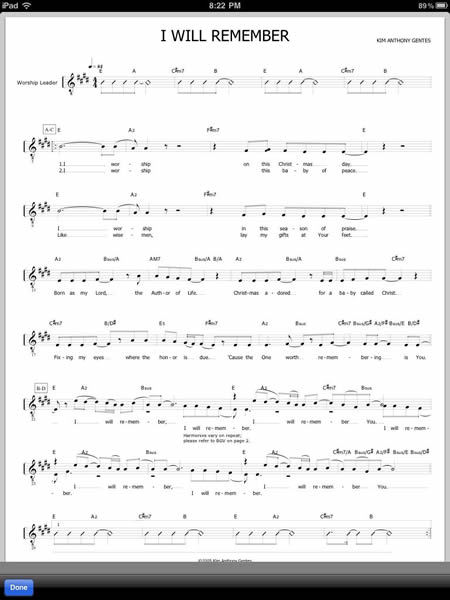
iPad, iPhone, iPod Touch users now have a greatly enhanced app for use with their core WorshipTeam.com service. The app includes the "Music Perform" function that allows users to launch any service (set) into a music stand usable mode. Your iPad becomes a digital music display for all the songs in your services/sets in WorshipTeam.com. Simply swiping the iPad moves to the next song. Additionally added is support for PDF sheet music display incorporated right into the Music Perform function. If you have any songs included in your service/set that you use sheet music PDFs for (instead of standard chord charts) those now display in crisp clarity inside your WorshipTeam.com app.
The app will display PDF sheet music wherever any song can be displayed, including the single song display area or a list or service collection.
For those who haven't heard about the new "Music Perform" function in the WorshipTeam.com App, the goal of the "Music Perform" button is to allow you to have a simple, clean interface with all your songs (PDFs or chord charts) displayed allowing you to page through them, just like you would for a physical songbook on a music stand. Great for use on a stage, in a small group or at home practicing. Your service/set is ready to go without having to print anything off. Here is is how to try it out --
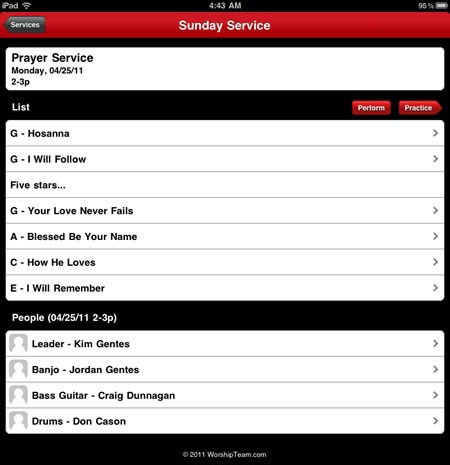

The music perform function works great on iPads used as music stands (as can be done easily by mounts like iKlip (http://www.ikmultimedia.com/products/iklip1), GigEasy (http://www.thegigeasy.com/) or Griffin iPad music stand mounts (http://www.griffintechnology.com/products/mic-stand-mount).
The music perform function is free and included in the iPad app with WorshipTeam.com and does not cost extra. Any WorshipTeam.com user can use this function.
bless you!
Kim Gentes
App, Device, Mobile, Planning Tools, Print Music, Software, Web, Web Applications, Web Service, Web Service - Music, iPad, iPhone 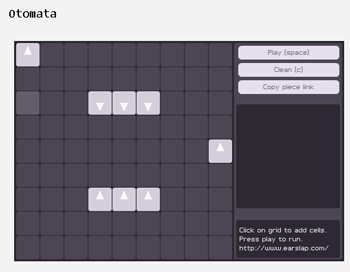 Remember the promises of science fiction? Well, things haven't turned out quite the way the Jetsons promised us. When they said "Flying cars, robotic servants, instant meals", we didn't know they meant "Southwest Airlines, automated sales calls to our cell phones, and McDonald's happy meals". But who's to blame? Well certainly not Batuhan Bozkurt.
Batuhan is a "sound artist" and programmer living in Istanbul, Turkey. And he has done his part in bringing forth the joyous reality of that fantasy of almost all great science fiction- the fusion of technology and art. But is it that hoped-for utopia where ones own thoughts of melodies were enough for mind-reading computers to generate the symphonic masterpeices of the future? Mr. Bozkurt doesn't promise such glorious realities, but he takes the needed baby-steps for our neophite, web-connected world. He calls it Otomata.
Quite simply, Otomata, is a sound generation web application. It generates tones based on a 9x9 grid which contains any number of bouncing boxes. You start with a blank grid. You add your boxes. You click play. The fun begins.
This might seem trivial (and it is), but Otomata is based on the same rules of operation that most iOS apps and even the first video game (Pong) held to- collision and redirection. The boxes you place on the grid all move, in any of the 4 directions you instruct them to. When they hit another box or a wall they alter direction. When they hit a wall, they emit a sound. The grid is set up in a specific musical configuration so that notes ascend a scale from left to right. You get the idea quickly. You develop patterns that create sound loops for basic rhythm and meter. Add some melodic chaos notes (boxes) to overlay said patterns of rhythm.
But the more complex you make them, the less sure you are of a clean results, or one that sounds musical (instead of an explosion of computer sounding blurps).
But enough talk. Try it out! Otomata is online, for all to try (apparantly, phone apps are in the works as well). You can go here and get started:
http://www.earslap.com/projectslab/otomata
Now for the really cool part. Once you develop an interesting pattern on Otomata, click the "Copy piece link" and you have the URL to your musical/web/grid configuration. Share it with your friends, build on each other's patterns. All very fun, time wasting and addictive. Real musos will initially bauk at this trivial tool, but finding the patterns is the key. Don't waste your time just throwing blocks on the board (at least don't keep doing it after 30 minutes or so). If you just do that, of course, you will be bored. Instead, start to develop a library of patterns that you can re-use for your bass end, your mid-chords and your high end rhythms. Then, start to mix and match and see what happens.
The app is online for anyone who has a web browser. Oh, a real web browser I mean- this one is in Flash, so you can't play it on iPads or iPhones (at least until they add Flash). However, the folks who wrote this online application have a great new port for the iOS devices and you can also download an app for your iPhone/iPod/iPad as well to take Otomata mobile.
Here are a couple patterns I worked on that I use as a base for more "compositions". Real music? Hmmm.. maybe not. But inventive, thoughtful, and certainly musical fun. You decide.
http://www.earslap.com/projectslab/otomata?q=4g3k5z4x0d0v7n7a8d8v
http://www.earslap.com/projectslab/otomata?q=3n4n5n3a4a5a8j0q177r
http://www.earslap.com/projectslab/otomata?q=3n4n5n3a4a5a8j0q
It's a fun time waster.. and your pattern recognition skills may just improve along the way!
Thanks Otomata! Thanks Batuhan Bozkurt!
Let's go people---
Go forth and blipify!
Kim Gentes
App, Blog, Flash, Mac, Media, Music Training, PC, Programming, Social Media, Software, Web, Web Service - Music  If you have come here, you recognize the power of writing, have a value for blogs and are probably interested in making some of your own writing accessibe via the web. But to make the most of online access and the attention of your potential readers, you should be considerate of a number of important concepts. These ideas are considered "givens" for many people who have been online for years, but to the person entering the online blogging world, these might be fresh thoughts.
 Design considerations:Blog, Social Media, Web
  Facebook is fast becoming the hub of our online activity, as both personal and organizational communications are often easier to do through Facebook than almost any other mechanism. Need to talk to relatives? Use Facebook. Have to organize a church small group? Making a Facebook group is a cheap, and effective method to factiliate communications. Want to reach customers for your business? Facebook pages and apps are becoming very important.
One of the most effective methods of quickly getting information out on Facebook is to "Link" an external page into Facebook, on a wall post or in a group or Page. Facebook nicely slurps up a summary of the external web page, blog or site and creates a thumbnail and header for the link that is easy for people to quickly see what the link is for. But there is a problem. Facebook sometimes cannot understand images that appear on external sites when the image or web page does not have interprettable or compatible properties. You will see the webpage text summary in the link preview, but not the image. It will looking something like this:
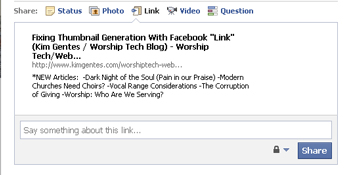
If the page had images and you don't see the image as a thumbnail option in the above preview, you will know there was a problem with the page or the image being interpretted correctly by Facebook.
If you try to link to an external page to post your link on Facebook and you find your image does NOT show up in the link summary, here are a few things you can try to get Facebook to slurp your image and place a thumbnail for your link in Facebook.
 Taller / Narrow Image
 Wider / Short Image
I wish I could tell you that Facebook is consistent with all the things it does, but frankly, it just isn't. Try each of the above fixes to see what your particular situation might be. There are several other articles out there that deal with meta data tagging and image specifications, but I have found that they are rarer cases, though important to look at. For more information on addressing this issue of thumbnails in Facebook links, this is a good all around article to read:
http://www.ehow.com/how_4938148_thumbnail-show-up-facebook-share.html
Happy Facebook linking!
Kim Gentes