Sometimes you just want to put a poll together that has simple functionality, easy use and no cost. Google has tons of features and it makes sense that inside of one of them we should be able to put together a code snippet for embedding a poll in a website or blog. Google Docs is the ticket for doing this. Here is a quick and easy guide for creating a poll for Google Docs users.
STEP 1 - Create the Form
Go to Google Docs, use the Create drop down, select "Form" as you see below

STEP 2 - Set up Form
Next you will see a new form presented to you. Depending on whether you are using Google apps or just an individual use account you may have different options at the very top, but in any case ignore those check-boxes at the very top for now.
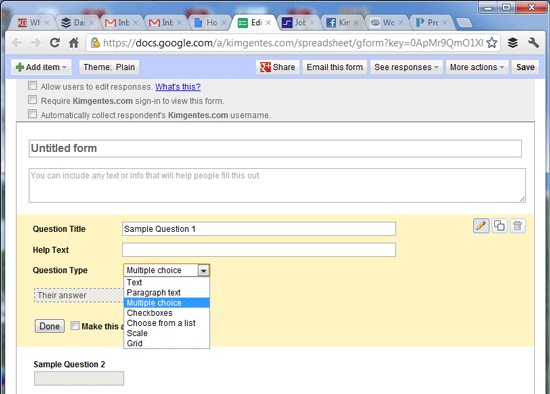
In this example, we will just create a bulleted form for a multiple choice question (you can do others as you like). For our example change the Question Type to Multiple choice, as you see below.
STEP 3 - Customize the Form and Questions & Answers
Now let's get down to your actual questions and answers in your form.
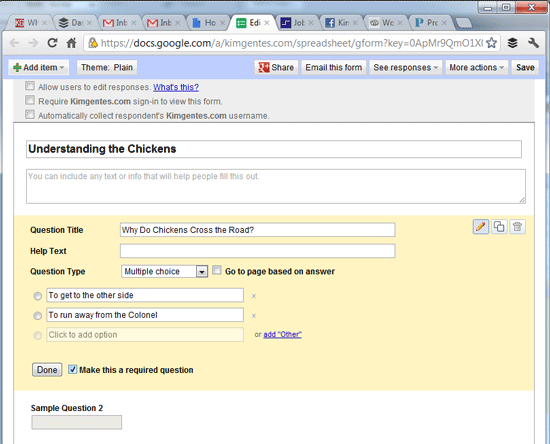
In this example, you can see I have called the form "Understanding the Chickens". Every form can have multiple questions, but I am just going to have one question for this example. My question title is "why do chickens cross the road". I also start entering some possible options for answers. Note that I also select the check box at the bottom of the question "Make this a required question", so that people must answer it. See below.
STEP 4 - Clean Up a bit
When you create a form, the default template automatically puts up a second sample Question. It's at the bottom of the form. For our example, let's just delete it. The delete button for any form element will be on the far right of the page area, as you see below (at the bottom of the image).

STEP 5 - Save and Preview Form
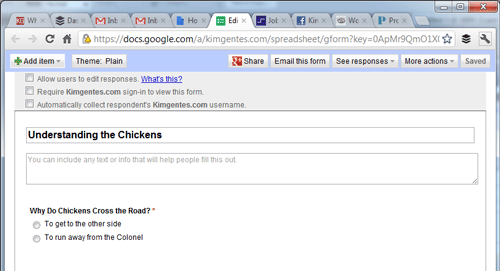
When you get things looking like you want, click the "Done" button the question you are editting. Then click the "Save" button on the top right hand area of the page. When you do that, the form will appear in the mode that users will see it, allowing you to preview it. Our sample should now look like this below.
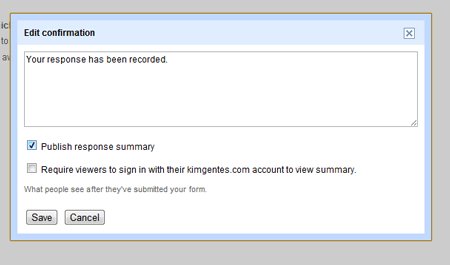
STEP 6 - Edit the Confirmation Page
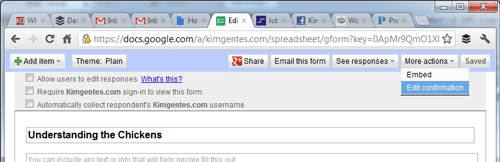
Google forms lets you edit the page that users see when they complete the form. You do this by first selecting the "More actions" drop down on the top right area of the page, and select the "Edit Confirmation" selection as shown below.
Immediately, you will be given access to the "Edit confirmation" dialog. This allows you to change the text as you wish to the user response page. But more importantly, it allows you to include a link to the summary data for your users. All users like to find out the results of most polls and this is what allows that. Make sure you select "Publish response summary" checkbox to allow your users to see the results. Again, unless you are using Google Apps for your domain, skip over the other checkbox for that. Your form should look like the following.
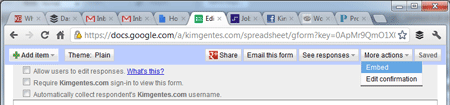
STEP 7 - Get Embed Code for Your Poll
You are on the home stretch, and just a couple things left and your poll will be live on your site. Before you can post the poll on your site, you must get the code from Google Docs. This is easy enough. On the form, once again select the "More actions" drop down on the top right area of the page, this time select the "Embed" selection as shown below.
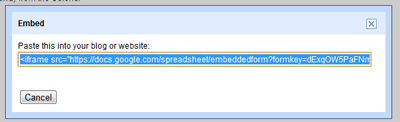
Immediately, you will be given access to the "Embed" dialog. This has one purpose- to let you copy the embed code from Google for use on your site. Your form should look like the following. Just copy the code to your computer's paste buffer for now.
STEP 8 - Paste Embed Code on your Website/Blog
Now take the code you have in your paste buffer and drop it into your own blog, CMS, webpage or such. Whether you are using Wordpress or native HTML editing or such, there will be a way to paste code snippets into your page. Check the instructions for your particular site editor on how to add widget code, and this will be the way you add this code snippet for your poll. In the case of our example, I am using Squarespace for my website, so I add my poll using its "Insert Code Block" icon, which is just a way to add custom widgets or code from other sources than the editor gives you. You can see me pasting the code as shown below.

You are now done adding your poll! Congrats! However, you will want to know how to access the poll results and go back and edit things later if necessary. See below for that info.
STEP 9 - Reviewing Results and Making Changes Later
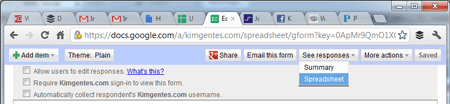
Reviewing the poll results at any time is easy to do. The results are stored in a spreadsheet, which you can access from the form. You do so by selecting the "See responses" drop down from the top right area of the form, and selecting the "Spreadsheet" option, as you see below. The spreadsheet will also be viewable directly in your google docs directory by now, if you are looking directly at that directory.
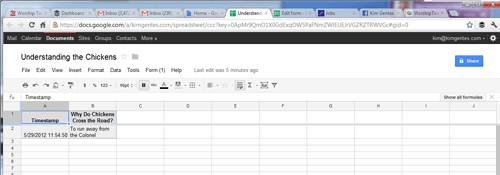
Once you access the spreadsheet, you will see the results in a regular cell/row layout, showing the responses of each poll-taker as you can see below.
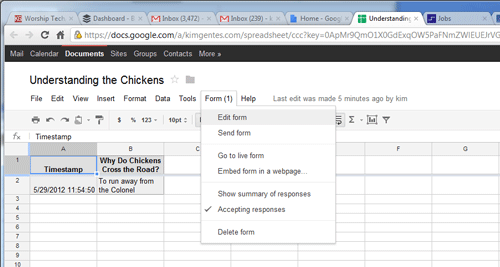
STEP 10 - Making Changes to the Poll After It's Launched
The great thing about Google docs is that you can always update or edit your forms/polls. When you access the form from Google docs it will open up to the spreadsheet view by default, but don't worry, you can always get back to the form editing/layout very easily. Simply, notice on the top of the spreadsheet view that there is a tab called "Form". Use that and select "Edit Form", which is the first drop down in the list, as you can see below. That will bring you back to editing the form. Also, of note are the several other features of the forms, which include a cool way to send the form via email or even shut down the poll so you can stop taking results. All very cool.
SAMPLE POLL
Below is the sample poll we've created in this step by step tutorial. Enjoy!

 code,
code,